We have been moved to http://www.bloganol.com/

Showing posts with label blogger tools. Show all posts
Wibiya toolbar (Wibar) is a powerful  Toolbar for your blog that enables your blogs to integrate the most exciting services, applications and widgets of their choice into your blog through customized web-based toolbars.This powerful webpage toolbar is the Product of  Modular Patterns Ltd., an Israeli startup company founded in 2008 which is backed by Dr. Yossi Vardi.

The Wibar offers you a fixed set of tools such as creating a blog community via facebook connect,
enabling twitter alerts on your blog and enabling post navigation and many more.Using wibar for your blog is absolutely free.You can use Wibar for your blog which is hosted in Blogger,Wordpress and self hosted blog and sites.Moreover this Toolbar is available in more than 20 languages.

To get this toolbar first you should signup to wibiya.After you signup wait for token for your account in your Email inbox.Once you sign in into wibiya customize the available wibar and install it in your blog.The process is really very simple.Hope you will love this webpage Toolbar too.
Read more
This is the simplest and also interesting tool for blogger.This tool shows you how many times has the post been viewed since the widget has been installed in the blog.

To show the total no of the posts viewed copy the following code and paste it to your blog.But remember one thing that showing your number of views in good below post title or other some highlighting area.

<b:if cond='data:blog.pageType == &quot;item&quot;'>
<div id='views-counter'>
<script src='http://wizom.net/counter.php' type='text/javascript'/> views
</div></b:if>
Read more
Syntax highlighter is a tool developed by Google Code that help a developer/coder to post code snippets online with ease and have it look pretty. It's 100% Java Script based and it doesn't care what you have on your server.

Is is simple to install syntax highlighter for your blog.First Download Syntax Highlighter into Your Computer.After that Extract the Files and Upload it to Your Google Pages Account.


Now in second step Login Into Blogger -> Goto Edit Html Page and Paste the following code between <head> and </head> Tags in your Template.

<link href='http://GOOGLEPAGES USERNAME.googlepages.com/SyntaxHighlighter.css' rel='stylesheet' type='text/css'/>
<script src='http://GOOGLEPAGES USERNAME.googlepages.com/shCore.js' type='text/javascript'/>
<script src='http://GOOGLEPAGES USERNAME.googlepages.com/shBrushCpp.js' type='text/javascript'/>
<script src='http://GOOGLEPAGES USERNAME.googlepages.com/shBrushCSharp.js' type='text/javascript'/>
<script src='http://GOOGLEPAGES USERNAME.googlepages.com/shBrushCss.js' type='text/javascript'/>
<script src='http://GOOGLEPAGES USERNAME.googlepages.com/shBrushDelphi.js' type='text/javascript'/>
<script src='http://GOOGLEPAGES USERNAME.googlepages.com/shBrushJava.js' type='text/javascript'/>
<script src='http://GOOGLEPAGES USERNAME.googlepages.com/shBrushJScript.js' type='text/javascript'/>
<script src='http://GOOGLEPAGES USERNAME.googlepages.com/shBrushPhp.js' type='text/javascript'/>
<script src='http://GOOGLEPAGES USERNAME.googlepages.com/shBrushPython.js' type='text/javascript'/>
<script src='http://GOOGLEPAGES USERNAME.googlepages.com/shBrushSql.js' type='text/javascript'/>
<script src='http://GOOGLEPAGES USERNAME.googlepages.com/shBrushVb.js' type='text/javascript'/>
<script src='http://GOOGLEPAGES USERNAME.googlepages.com/shBrushXml.js' type='text/javascript'/>
<script src='http://GOOGLEPAGES USERNAME.googlepages.com/shBrushRuby.js' type='text/javascript'/>

In the above Code Replace GOOGLEPAGES USERNAME with your Googlepages username where you have Uploaded the Files.

In the Third step Paste the following Code just before </body> Tag in your Template.

<script language='javascript'>
function start() {
dp.SyntaxHighlighter.BloggerMode();
dp.SyntaxHighlighter.HighlightAll('code', true, true, false, 1, false);
}
window.onload = start;
</script>

After you Complete the above steps Save your Template.Now you have to ways to implement Highlighter style in your Blog post Codes.

By Using <pre> and </pre> Tags.

While Creating or Editing your Blog Posts write the codes between <pre> and </pre> with name Code and Style c-sharp as in the following Example.

<pre name="code" class="c-sharp">
The Code Goes Here......
</pre>


Second is by Using Text area.

Use the Text Area as given in the following Example.

<textarea name="code" class="c#" cols="60" rows="10">
... The code Goes here ...
</textarea>


Thats all about this Blogger hack.If you want more blogger hacks then Visit Blogger hack directory Page or If you want free Blogger templates then visit Blogger Templates directory Page.
Read more
Before you add any buzzup vote buttons on your blog you must know about buzz up.For this first you must Sign up to buzz up.In short Buzz up is a social networking site like digg,reddit,etc from where you can drive lots of traffic to your blog.It is a part of Yahoo company therefore you can sign up to buzz up using your Yahoo Email Id.Here are the Codes for Buzz up buttons from which you can put buzz up buttons on your blog.


Buttons with vote count
“Vote Now” only appears until there is at least 1 vote.

Square Button
(51x80px)


<script type="text/javascript" src="http://d.yimg.com/ds/badge2.js" badgetype="square">ARTICLEURL</script>


Icon with Text Link, Styled by Page Context
(16x16px logo and the text 'Buzz up!')


<script type="text/javascript" src="http://d.yimg.com/ds/badge2.js" badgetype="text-votes">ARTICLEURL</script>


Small Rectangular Button (159x29px)


<script type="text/javascript" src="http://d.yimg.com/ds/badge2.js" badgetype="small-votes">ARTICLEURL</script>


Medium Rectangular Button (182x39px)


<script type="text/javascript" src="http://d.yimg.com/ds/badge2.js" badgetype="medium-votes">ARTICLEURL</script>


Large Rectangular Button (203x50px)


<script type="text/javascript" src="http://d.yimg.com/ds/badge2.js" badgetype="large-votes">ARTICLEURL</script>

Note : In the above codes Replace ARTICLEURL with <data:post.url/>.

Read more
There are mainly two reasons why should we optimize our blog CSS code.One is to get CSS file size smaller and for better written code.If the size of CSS code is smaller and better written than the blog opens more faster.Besides this it also helps you shorthand your blog CSS code and even more makes CSS codes clean.

Yes friend i am talking about a site named cleancss which helps you optimize you blog's CSS code.It can be also said as a tool for optimizing your blog CSS code online.If you think that the code will changed after optimization then don't worry the properties of the CSS code will not lost.So if you think this is useful then start optimizing now.

Here is the snapshot of the result of Optimized Blog CSS code.

Read more
Previously we already written a post about Creating CSS popup Image viewer in blogger.This is just the upgraded form of that post.We have make some good changes in that post.If you Like to see the demo then click here.

To setup popup Image viewer in your blog First of all copy the following CSS Code and paste it between <head> and </head> Tags of your Template.
<style type="text/css">

.thumbnail{
position: relative;
z-index: 0;
}

.thumbnail:hover{
background-color: transparent;
z-index: 50;
}

.thumbnail span{ /*CSS for enlarged image*/
position: absolute;
background-color: #ffffff;
padding: 5px;
left: -1000px;
border: 1px solid #000;
visibility: hidden;
color: black;
text-decoration: none;
}

.thumbnail span img{ /*CSS for enlarged image*/
border-width: 0;
padding: 2px;
}

.thumbnail:hover span{ /*CSS for enlarged image on hover*/
visibility: visible;
top: 263px;
left:282px; /*position where enlarged image should offset horizontally */

}

</style>


Second step is to paste the following Code into your blog Posts.
<a class="thumbnail" href="#">
<img src="http://www.t2tibet.com/Images/mount-everest.jpg"
border="0" height="66" width="100" /><span>
<img src="http://www.t2tibet.com/Images/mount-everest.jpg" /></span></a>


Replace the Image Url above with your image Url and see your work done.
Read more
Link popularity check is a software created by Technet that checks the link popularity of your website on several search engines and also compares your site to other sites on the internet.

Link popularity check is completely safe to install on your system.It doesn't change the system registry and will not make any authorized connection from your system.This software also includes an uninstaller.

Link popularity check is a free software that means you don't need to pay anything and shouldn't wait to use it.

You should be able to fulfill some system requirements to use this software.You should have Windows 98/ME/2000/XP and 8 MB free RAM.


Read more
There are many advantages of Keeping Technorati tags in your blog posts.It helps you to increase Technorati Rank and Authority.Adding Technorati Tags Using Hyperlink one by one is very boring and time consuming.Therefore we brought you a new tool to add Technorati tags below Each just by Entering Tags like Blogger.This multiple word technorati tag creator for blogger is created by our friends of consumingexperience.com.There are certain steps to be followed to install this Tag creator for your blog.

Step 1
You must need greasemonkey installed in your browser.If you have already installed it in your browser then its OK otherwise you must install greasemonkey in your browser and you must have Mozilla Firefox Browser.To get greasemonkey visit This Page.

Step 2
After you install greasemonkey in your browser Restart your browser(Recommended).Now you have to install a user script in your blog .For this Click on Get User script and Click Install.

Step 3
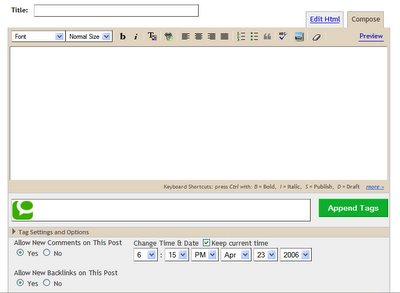
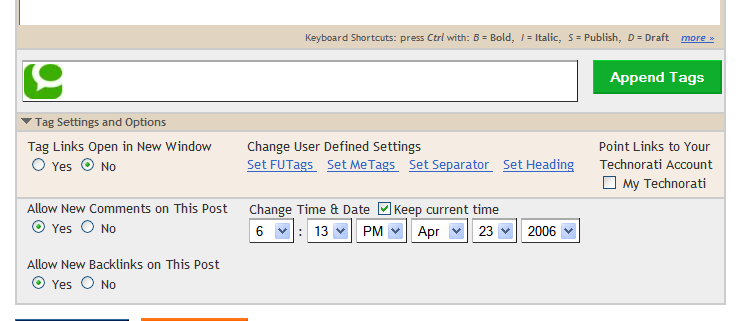
After you Install user script goto Posting Page in blogger you will see green Technorati icon for entering Tag , Green Append Button and tag and Setting options Link just like in the Snapshot Below.


How to Insert Tags in Posts?

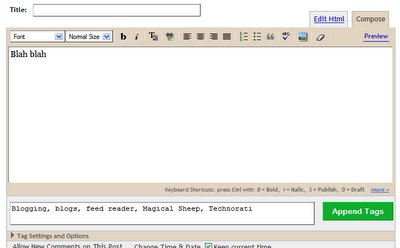
For this enter you choice Tags in Tag box by separating using commas.eg blogger hacks,Blogger tools,......


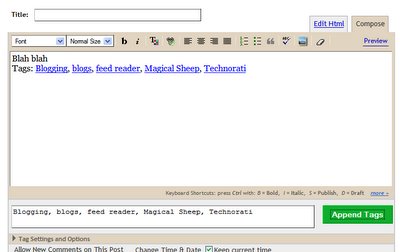
After you Enter Tags in Tag Box Click Append Tag Button.


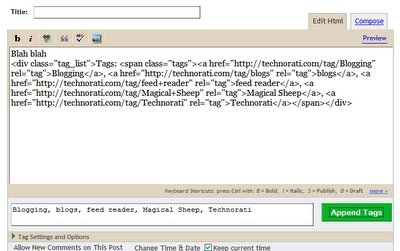
After you append Tags in your blog You can see your tag Code in Html section like this.


How to Open Tags in new Window?

To open Tags in new window Click Tag settings and options Link.After that Check on Yes on Tag Links open in new window.


Technorati Tags: , , ,

Read more
In the previous hack we have learned to create popup Image viewer in blogger . Now we are learning to change opacity of the image on mouse hover and applying a border to any image link when we hover the image . the credit of this hack directly goes to dynamicdrive.Now see the following demos that gives you clear view of this hack.

Demo:Hover the image with your mouse pointer.

Opacity Highlight


Border Highlight


How was demo?Good.Now lets start the installation of this hack . First thing is to Copy the following CSS code to the head section of your blog.
<style type="text/css">

.toggleopacity img{
filter:progid:DXImageTransform.Microsoft.Alpha(opacity=50);
-moz-opacity: 0.5;
}

.toggleopacity:hover img{
filter:progid:DXImageTransform.Microsoft.Alpha(opacity=100);
-moz-opacity: 1;
}

.toggleopacity img{
border: 1px solid #ccc;
}

.toggleborder:hover img{
border: 1px solid navy;
}

.toggleborder:hover{
color: red; /* Dummy definition to overcome IE bug */
}

</style>
Now second and Last step Copy the following code and Paste it to your Blog post or Sidebar adding a new Html Page.
<a class="toggleopacity" href="http://www.bloganol.blogspot.com/">
<img src="https://blogger.googleusercontent.com/img/b/R29vZ2xl/AVvXsEhS8ZWV2TEmbt9CmOMecb0kafoaNoTK37w0myfANx0NNDiV479itBqLBUYPYXOmHCPS6fjB8nBARHedhPJCzpHE2ZZYsJAAIM1MQtmF7qn35LlxQK1g78bIuFv3eKwsON343mNQCKvufEA/s400/cooltext89264568.png" border="0" />
</a>

<a class="toggleborder" href="http://bloganol.blogspot.com/">
<img src="https://blogger.googleusercontent.com/img/b/R29vZ2xl/AVvXsEjX4ePypbcWhZ13Y9xdwZoK7jpMqOJdJ6HfK8VZZwsPfNPLCfxwxMsaRdWk_Y6YVYP9WfFgMoKGw53-qUi_8JyO61qQTrz85LKXorGx_g0_5TJA4kLei9E35HNr7FbQAPzHK6KjlutBIgs/s1600-r/bloganol.jpg" border="0" />
</a>
In the above code the firt part defines the Opacity Effect and The second Part Defines the Border effect . You can change the link and Image url of own own.

If you got any problem ,not satisfied or Liked this posts then please leave a comment on this page. you single comments gives 1 million Calorie of Energy to do good works.
Read more
The image is small in the webpage but seen bigger when you hower the image.Isn't it interesting?Yes.Bloganol brings you the greatest image hack.This popup image viewer is good for those blogger who like to place more images in their blog posts but wants less area to be occupied and wants image seen clear.

Demo: Hover the following thumbnail Images with your Mouse Pointer.If it doesn't work then visit this demo page link.


Simply beautiful.

So real, it's unreal. Or is it?

Installation of this widget is not so hard. First of all copy the following CSS code to the head section of your blog.

<style type="text/css">

.thumbnail{
position: relative;
z-index: 0;
}

.thumbnail:hover{
background-color: transparent;
z-index: 50;
}

.thumbnail span{ /*CSS for enlarged image*/
position: absolute;
background-color: lightyellow;
padding: 5px;
left: -1000px;
border: 1px dashed gray;
visibility: hidden;
color: black;
text-decoration: none;
}

.thumbnail span img{ /*CSS for enlarged image*/
border-width: 0;
padding: 2px;
}

.thumbnail:hover span{ /*CSS for enlarged image on hover*/
visibility: visible;
top: 0;
left: 60px; /*position where enlarged image should offset horizontally */

}

</style>

And the second and Last step is to copy the following html codes and paste it to your blog either while posting or in your sidebar adding a new page Element.

<a class="thumbnail" href="#thumb"><img src="Image Url" width="100px" height="66px" border="0" /><span><img src="Image Url" /><br />Simply beautiful.</span></a>

<a class="thumbnail" href="#thumb"><img src="Image Url" width="100px" height="66px" border="0" /><span><img src="Image Url" /><br />So real, it's unreal. Or is it?</span></a>


In the above code replace Image Url with your Image Url .

If you got any problem , not satisfied or liked this post then please leave a comment on this post.
Read more
Give you page a bubbly personality with this script! Bubbles drift upwards, then vanish, in an incessant loop .Isn't it Interesting? You can simply create this hack on your blog by pasting the following Code in your Template.
<script language="JavaScript1.2">
<!-- Begin

//Bubble Script by Lisa (issa@lissaexplains.com, http://lissaexplains.com)
//Based on code by Altan d.o.o. (snow@altan.hr)
//For full source code and installation instructions to this script, visit http://www.dynamicdrive.com

var no = 15; // image number or falling rate
var speed = 2; // the lower the number the faster the image moves
var snow = new Array();
snow[0] = "http://www.dynamicdrive.com/dynamicindex3/bubble.gif"
snow[1] = "http://www.dynamicdrive.com/dynamicindex3/bubble.gif"
snow[2] = "http://www.dynamicdrive.com/dynamicindex3/bubble.gif"

var ns4up = (document.layers) ? 1 : 0; // browser sniffer
var ie4up = (document.all) ? 1 : 0;
var ns6up = (document.getElementById&&!document.all) ? 1 : 0;
var dx, xp, yp; // coordinate and position variables
var am, stx, sty; // amplitude and step variables
var i, doc_width = 800, doc_height = 1800;

if (ns4up||ns6up) {
doc_width = self.innerWidth;
doc_height = self.innerHeight;
} else if (ie4up) {
doc_width = document.body.clientWidth;
doc_height = document.body.clientHeight;
}

dx = new Array();
xp = new Array();
yp = new Array();
am = new Array();
stx = new Array();
sty = new Array();
j = 0;

for (i = 0; i < no; ++ i) {
dx[i] = 0; // set coordinate variables
xp[i] = Math.random()*(doc_width-50); // set position variables
yp[i] = Math.random()*doc_height;
am[i] = Math.random()*20; // set amplitude variables
stx[i] = 0.02 + Math.random()/10; // set step variables
sty[i] = 0.7 + Math.random(); // set step variables
if (ns4up) { // set layers
if (i == 0) {
document.write("<layer name=\"dot"+ i +"\" left=\"15\" top=\"15\" visibility=\"show\"><img src=\""+ snow[j] + "\" border=\"0\"></layer>");
} else {
document.write("<layer name=\"dot"+ i +"\" left=\"15\" top=\"15\" visibility=\"show\"><img src=\""+ snow[j] + "\" border=\"0\"></layer>");
} } else if (ie4up||ns6up) { if (i == 0)
{
document.write("<div id=\"dot"+ i +"\" style=\"POSITION: absolute; Z-INDEX: "+ i +"VISIBILITY: visible; TOP: 15px; LEFT: 15px; width:1;\"><img src=\"" + snow[j] + "\" border=\"0\"></div>");
} else {
document.write("<div id=\"dot"+ i +"\" style=\"POSITION: absolute; Z-INDEX: "+ i +"VISIBILITY: visible; TOP: 15px; LEFT: 15px; width:1;\"><img src=\"" + snow[j] + "\" border=\"0\"></div>");
}
}
if (j == (snow.length-1)) { j = 0; } else { j += 1; }
}

function snowNS() { // Netscape main animation function
for (i = 0; i < no; ++ i) { // iterate for every dot
yp[i] -= sty[i]; if (yp[i] < -50) {
xp[i] = Math.random()*(doc_width-am[i]-30);
yp[i] = doc_height;
stx[i] = 0.02 + Math.random()/10;
sty[i] = 0.7 + Math.random();
doc_width = self.innerWidth;
doc_height = self.innerHeight; }
dx[i] += stx[i];
document.layers["dot"+i].top = yp[i]+pageYOffset;
document.layers["dot"+i].left = xp[i] +
am[i]*Math.sin(dx[i]);
}
setTimeout("snowNS()", speed);
}

function snowIE_NS6() { // IE main animation function
for (i = 0; i < no; ++ i) { // iterate for every dot
yp[i] -= sty[i];
if (yp[i] < -50) {
xp[i] = Math.random()*(doc_width-am[i]-30);
yp[i] = doc_height;
stx[i] = 0.02 + Math.random()/10;
sty[i] = 0.7 + Math.random();
doc_width = ns6up?window.innerWidth-5:document.body.clientWidth;
doc_height = ns6up?window.innerHeight-5:document.body.clientHeight;
}
dx[i] += stx[i];
if (ie4up){
document.all["dot"+i].style.pixelTop = yp[i]+document.body.scrollTop;
document.all["dot"+i].style.pixelLeft = xp[i] + am[i]*Math.sin(dx[i]);
}
else if (ns6up){
document.getElementById("dot"+i).style.top=yp[i]+pageYOffset;
document.getElementById("dot"+i).style.left=xp[i] + am[i]*Math.sin(dx[i]);
}
}
setTimeout("snowIE_NS6()", speed);
}

if (ns4up) {
snowNS();
} else if (ie4up||ns6up) {
snowIE_NS6();
}
// End -->
</script>


Read more
After disable right click in blogger hack Bloganol brings you a hack to disable text selection in your blog. This hack was created by Dynamicdrive.It is also applicable to those bloggers who don't like their content copied by others. If you are among them then Copy the following code and Paste it to your blog.

<script type="text/javascript">

/***********************************************
* Disable Text Selection script- © Dynamic Drive DHTML code library (www.dynamicdrive.com)
* This notice MUST stay intact for legal use
* Visit Dynamic Drive at http://www.dynamicdrive.com/ for full source code
***********************************************/

function disableSelection(target){
if (typeof target.onselectstart!="undefined") //IE route
target.onselectstart=function(){return false}
else if (typeof target.style.MozUserSelect!="undefined") //Firefox route
target.style.MozUserSelect="none"
else //All other route (ie: Opera)
target.onmousedown=function(){return false}
target.style.cursor = "default"
}

//Sample usages
//disableSelection(document.body) //Disable text selection on entire body
//disableSelection(document.getElementById("mydiv")) //Disable text selection on element with id="mydiv"

</script>
Read more
This is the cross browser DHTML script from dynamicdrive that prevents default right menu from popping up when right mouse is clicked in the blog.This tool is very useful to different site owners who don't want to let their site content Copied.This script is provided in two style Alert and non alert . After you use Alert Script if someone Right click then a Message is appeared and if you use non alert then no message is displayed.To setup this tool in your blog Copy the Following code and paste it to your blog by adding a new page element.

Message Alert Script:
<script language=JavaScript>
<!--

//Disable right mouse click Script
//By Maximus (maximus@nsimail.com) w/ mods by DynamicDrive
//For full source code, visit http://www.dynamicdrive.com

var message="Function Disabled!";

///////////////////////////////////
function clickIE4(){
if (event.button==2){
alert(message);
return false;
}
}

function clickNS4(e){
if (document.layers||document.getElementById&&!document.all){
if (e.which==2||e.which==3){
alert(message);
return false;
}
}
}

if (document.layers){
document.captureEvents(Event.MOUSEDOWN);
document.onmousedown=clickNS4;
}
else if (document.all&&!document.getElementById){
document.onmousedown=clickIE4;
}

document.oncontextmenu=new Function("alert(message);return false")

// -->
</script>

Message nonAlert Script:
<script language=JavaScript>
<!--

//Disable right click script III- By Renigade (renigade@mediaone.net)
//For full source code, visit http://www.dynamicdrive.com

var message="";
///////////////////////////////////
function clickIE() {if (document.all) {(message);return false;}}
function clickNS(e) {if
(document.layers||(document.getElementById&&!document.all)) {
if (e.which==2||e.which==3) {(message);return false;}}}
if (document.layers)
{document.captureEvents(Event.MOUSEDOWN);document.onmousedown=clickNS;}
else{document.onmouseup=clickNS;document.oncontextmenu=clickIE;}

document.oncontextmenu=new Function("return false")
// -->
</script>
Read more
It is the tool that detects your surfer's screen's height , width and color depth and displays it . To setup this widget in your blog just come the following code and paste it into your blog by adding a new page element.

<table border="0">
<tr>
<td><form method="POST" name="t">
<table border="0">
<tr>
<td valign="top" width="150"
bgcolor="#efefef"><strong>Your screen's width:</strong></td>
<td><input type="text" size="20"
name="t1" value="not supported"></td>
</tr>
<tr>
<td valign="top" width="150"
bgcolor="#efefef"><strong>Your screen's height:</strong></td>
<td><input type="text" size="20"
name="t2" value="not supported"></td>
</tr>
<tr>
<td valign="top" width="150"
bgcolor="#efefef"><strong>Your screen's color Depth:</strong></td>
<td><input type="text" size="20"
name="t3" value="not supported"></td>
</tr>
<tr>
<td valign="top" width="150"
bgcolor="#efefef"><strong>Your screen's pixel Depth:
</strong></td>
<td><input type="text" size="20"
name="t4" value="not supported"></td>
</tr>
</table>
</form>
</td>
</tr>
</table>
<p align="left">
<script>
<!--

/*
Surfer's Screen Type Detection Script- © Dynamic Drive (www.dynamicdrive.com)
For full source code, installation instructions,
100's more DHTML scripts, and TOS, visit dynamicdrive.com
*/

function show(){
if (document.all||document.getElementById||document.layers){
document.t.t1.value=screen.width
document.t.t2.value=screen.height
document.t.t3.value=screen.colorDepth
document.t.t4.value=screen.pixelDepth
}
}
show()
//-->
</script>
Read more